LAURANKA
LAURANKA TIME CLOCK SERIES 3
Understanding your new Series 3 software
This guide is designed as a quick heads up for existing Version 2 customers to quickly and easily understand the main differences between your old Version 2 software ad your new Series 3 Software
Step 1: Understanding Your New Series 3 Software
Firstly, don't PANIC. In all seriousness the main differences between your old software and the new is one of evolution not revolution and for the most part if you are familiar with Version 2 and the concepts then the new Series 3 should be straight forward to understand. The following 10 simple steps will guide you through the main differences and processes so you understand them. If you do need additional assistance please don't hesitate to call us on the Helpdesk.
Verification Code - Please call us when you are ready for your verification code to activate the software (you have up to 30 days).
Helpdesk +64 6 877 00 33
Step 2: Verification Code
Please contact Lauranka either via phone or email to obtain your verification code.
Helpdesk: +64 6 877 00 33
or Email: support@lauranka.co.nz
You have 30 days to enter this code.
Step 3: Database Migration
We now store the Timeclock data in a different format. As such on the first time you run the software it will ask you how far back you wish to archive the data into the new database format (excludes those who have the Job tracking Module) . You can select the desired period and Archive. This process may take a while depending upon the current number of active employees and the period you are going back. The good thing is though that this process is entirely automated so if you need to have a cup of tea or similar now would be a good time.
Step 4: Correcting Historic Missing Punches
Series 3 now allows you to 'Close Week'. This function locks all data in place. As part of this process we validate against Missing punches and require all missing punches to be remedied in order for a week to be closed. In order for you to utalise this new 'Close Week' function it is important that any historic Missing Punches are remedied. Step 3 provides for a simple process to remedy any Missing Punches by deleting any historic clocking associated with a Missed Punch. As this Clocking has no worked hours associated with it (as there is no matching clocking) then this will not affected stored worked. To fix historic Missing Punches simply press 'Fix Historic Missing Punches'. This process is very quick.
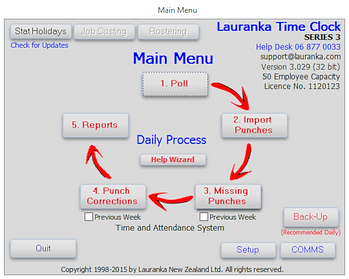
Step 5: Understanding the new Process
Series 3 now makes your daily processing more logical and easy. The big differences are 3. Missing Punches and 4. Corrections.
Missing Punches (Step 3)
You can now click directly off the Main Menu to check for any missing punches for the Current Week. If you tick 'Previous Week' it automatically goes to last week. If you have any Missing Punches you can double-click on them and go straight to the employees Corrections Screen to remedy this.

4. Corrections (Step 4)
Like Missing Punches you can now click directly off the Main Menu to check and make any Corrections for the Current Week (or Previous). Once in Employee list you can double-click on the desired employee and go straight to the employees Corrections Screen.

Closing Week
Closing a week locks all calculated values in place and can be performed 1 of 3 ways. All methods are done within the Corrections menu. Firstly you can Close by individual employee within their full Corrections Screen 'Close Week'. Likewise this individual Close can be performed from the Corrections List Screen showing all employees. Please not if a week is open it the little Box on this Corrections List screen will be Green. Once closed the box will be Red (when no week has ever been closed it will be Blank). The final option is you can close the week for all employees by selecting the button on the bottom-right of this Corrections List Screen 'Close Display week For All Employees'

5. Reports (Step 5)
The reports have been updated to reflect the new database structure and likewise all custom reports have been renamed to abbreviated names. As a result you may need to reselect your Favourites. Remember to add a report to your Favourites simply right-click on the Report and select 'Set to Favourites'.
Setup Menu
The functions in this part of the Software again very similar to what you are used but like the Main Screen just arranged in a manner to make the setup process more logical and easy to understand.
Employees (Step 4)
The Employee Setup function is very similar to Version 2 with one main difference. You can no longer delete old employees. When an employee leaves you now 'Terminate' them.

Final Comment
The above is designed a super quick guide to give you the ability to continue using your new Series 3 Time Clock Software. There are loads of other cool new features and functionality that you'll discover. Please remember that on almost every page is a 'Help Wizard' button that will provide guidance on the various features you see. Likewise please don't hesitate to call the Helpdesk (+64 6 877 00 33) should you need further assistance. Finally if you would like some one-on-one online training please just give us a call on the Helpdesk to organise this. It is free and covered as part of your Annual PSA Fee.
Thanks for taking the time to read the above and we do hope you enjoy you new software.